
Introduciton
We’ve reached the end of our Learning To Create Fire posts and are probably coming to the end of the research process of this blog, congratulations! In this post we’ll cover a similar process to the Campfire Scene: Part 2, setting up lights, tweaking materials and adding a meshlight before rendering our simulation and compositing.
Setting up the lighting
Firstly copy/paste over the first three lights we created for our campfire scene (the SkyLight, MoonLight and BackgroundLight). These are not difficult to set up and again have already been covered so see the previous post for detail on how to generate them. Duplicate the mantra_campfire node as well and update the camera/path/objects so we can fire off an initial render and see what our scene looks like and what needs changing.
At the moment our lighting is terrible because the scene takes place in a dome and none of our light is actually reaching our subjects. We’ll firstly tweak the SkyLight which is operating as our ambient light. Duplicate it and make sure your Mantra node is picking up the new light as well then, in the Shadows tab change the Type to No Shadows. Now we have a base layer of light but there’s still plenty to change.
Rather than having to set up our own three point lighting made out of three separate lights all with different settings, we can just drop a Three Point Light node down that does it for us. Add this to the Mantra node then look at the scene view, we can see they are currently pointing at the origin so use the Translate values in the node parameters to move it over to the centre of our shot. Now the problem is we have too much light in our scene.
Currently our Key Light should be pointing pretty much from the camera position at the centre of the scene, we need to move this closer to the ground, further away from the snake and over to the left (Rickles’ DTL and Transform Values -13.9, 136, 5, -4, 0, 10) which can be done in the individual light settings.
Our Rim/Back Light should start off just behind the snake, this is nearly in the right position but still needs moving down and away from the centre a little so the light isn’t so intense (DTL -13, -10, 0. Transform 0, 0, 13). We also want to change the Light Colour of our Rim Light to a middle orange to give us some contrast with the other lights.
Our Fill Light will therefore have started off right behind our reference figure, this time we want to move it up and back and a little to the right so the lights are fairly equally spaced (DTL -23, -116, -6. Transform 2, 0, 14). For this light we’ll use a very pale blue Colour, again to create a contrast. These colours are, in part, for stylistic purposes so if you want to go for a different style then be my guest.
If you check your render view right now it’s clear our lights are still too bright and we could definitely stand to lose some intensity. Drop the Key Light Intensity down to 0.5 but increase the Intensity of our Rim Light slightly to 1.5 so we have a little more of a contrast. We also don’t need to be rendering the entire frame every time during this process so hold shift and drag an area in your render view to only render a small area quickly so we can see our tweaks’ effect on our scene. This also highlights just how polygonal our scene is, luckily to fix this all we have to do is drop a Subdivide node before the Null in our set geometry network with a Depth of 1 and our edges should look more curved. Lastly, in the Background Light, increase the Intensity to 0.5 as we don’t want it to look like night time like we did in the campfire scene.
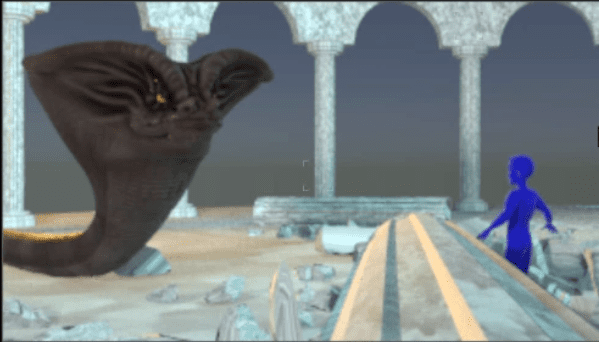
Our finished scene lighting.
Tweaking The pyro Material
Jump to frame 95 (or any other frame where there’s a lot of fire) and we will set up our flames material. Place a Fireball material in the Material layer from the tool palette like we did before with the Flames in the campfire and then assign it to our fire breath in the snakefire_import>Material tab using the browser. If we do a preliminary render we can already see a couple of problems. Firstly, like before, there is very little density so increase the Density Scale of our material to 10 which should increase the smoke contribution significantly. This smoke is looking a bit on the bright side however so darken the grey of the Smoke Colour significantly (to about 0.01 in all values) to really bring this down.
We need a lot more contributions from our flames as they are being overpowered by our smoke at the moment so increase the Fire Intensity Scale to 20. Next we need to space out the colours so increase the Temperature Scale to 1 and your Input Range Max to 4. We’re going to add a red to our colour ramp between the black and orange so just click on the ramp to add a new point and set the colour to a very dark red – now we have a nice gradient between colours.
To further increase the shading in our smoke increase the Shadow Density to 10. We’re also then going to ramp up both the Smoke and Fire Intensity Field by enabling Fit To Range (Unclamped) and setting the range of the smoke to 0-4 and the fire to 0-3 to get a strong contrast for both of them.
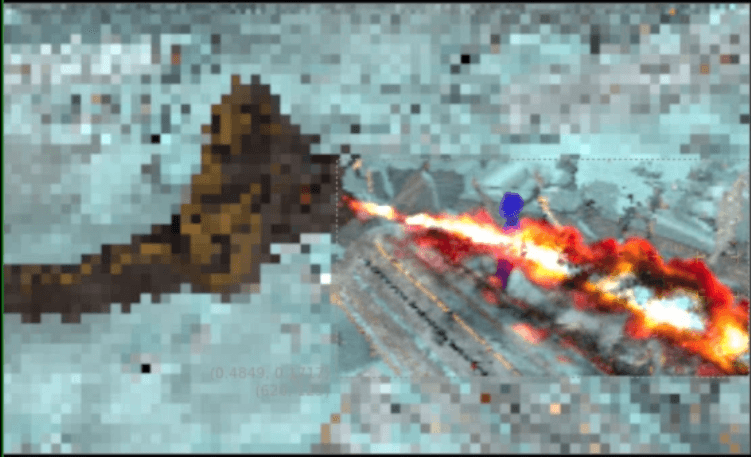
The snakefire with the edited flames material.
Setting up the meshlight
Copy/paste the campfire_meshlight network and the GeoLight light node from our other save file as we can just edit these for our snake fire rather than setting up brand new networks. Update the OM path in the snakefire_meshlight so it points at the Null in the snakefire_import and the network should adapt. We need to edit the colour ramp a little for our meshlight as, at the moment, we’re going to be creating a lot of white light and we want more orange. In the Attribute From Volume scroll down to the Vector Ramp and move the points around to reduce a lot of the white in the ramp so it’s mostly red and orange. Once you have a colour ramp you’re satisfied with, add your GeoLight to the Mantra node and do another test render.
The fire breath looks like it’s generating light a little too far away because of the settings we set up for our campfire light. In the GeoLight > Attenuation Options reduce the Half Distance to 0.3, increase the Attenuation Start to 0.2 and drop the drop the Active Radius to 5 and this should increase the concentration of our light in a smaller area.
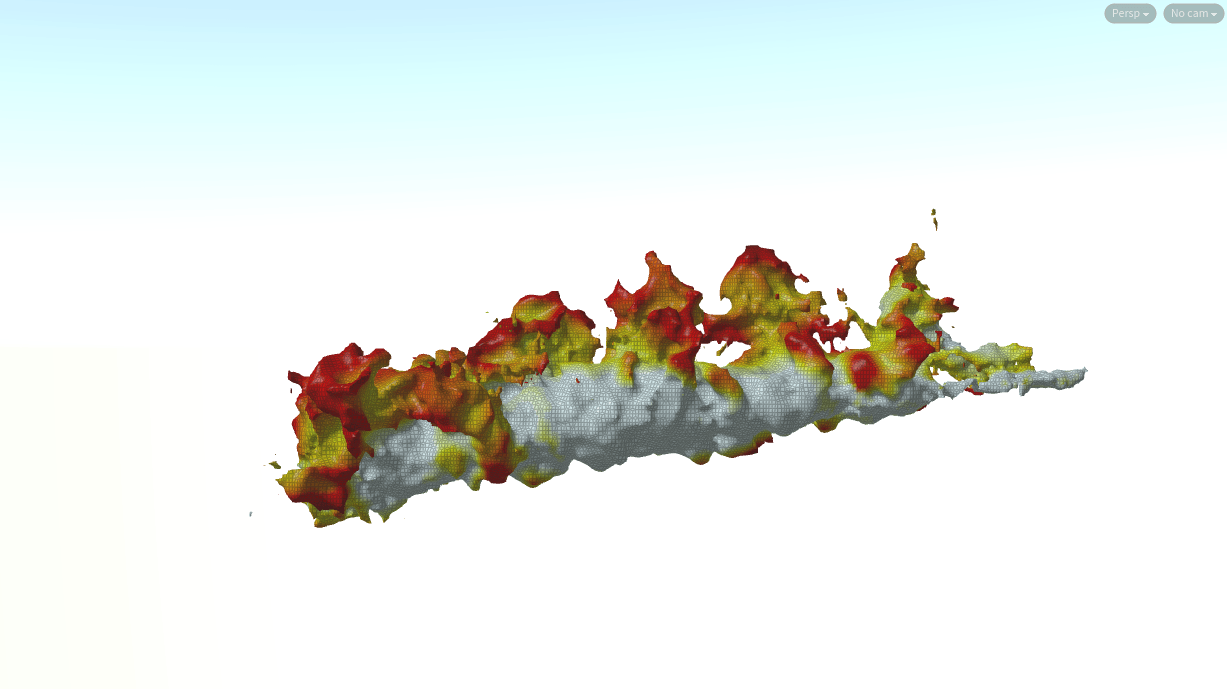
Our snakefire meshlight geometry.
Seperate Passes and Rendering
For our snake fire scene we are going to use 3 render passes so create 3 duplicate your original Mantra twice so we have 1 for the set, 1 for the fire and 1 for the embers.
Mantra_set
For our set the only candidate objects we want are the networks that were already created for us at the beginning of the creation process: reference_figure, the_set and the_snake.
Mantra_Fire
For our fire pass we want to keep all the candidate objects we had previously except our embers network. Then copy/paste the “reference_figure, the_set and the_snake” into the Forced Matte field so they are not rendered unnecessarily. Lastly, in the Exclude Lights set the background light that is creating our sky map as we only want this to be rendered as part of our set.
Mantra_Embers
In the embers we want the same set up as the Mantra_Fire but this time we also want the snakefire_import in the Forced Matte as well and the embers network back in the Candidate Objects so only the embers themselves are rendered.
With that we are ready to render out our final composition. This will take quite a long time as it is a big scene we are creating but hopefully the separate nodes should help to break this up considerably.

The final snake fire render.
REFERENCES
- Pluralsight (2016) Introduction to Houdini Pyro FX. Available from: https://app.pluralsight.com/library/courses/introduction-houdini-pyro-2504 [accessed 21st November 2018].